Race Screen
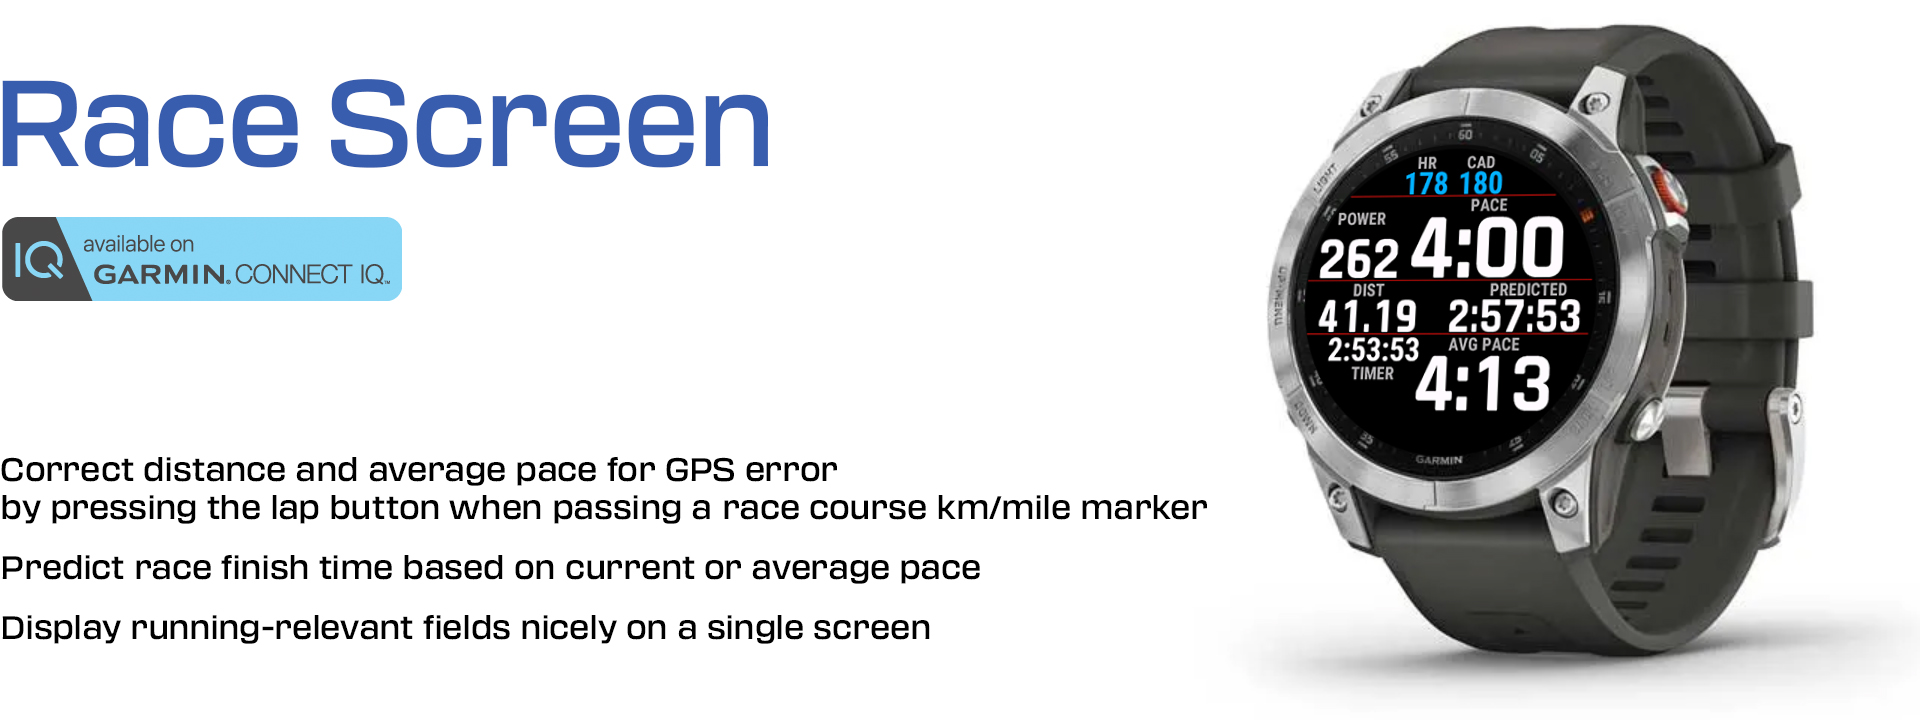
Race Screen is a data field for Garmin watches that displays the most relevant information for running a race or training. It can also correct the difference between the GPS-measured distance and the actual race course distance: when enabled in its settings, pressing the lap button when passing a course marker rounds the distance it displays and adjusts the average pace accordingly. If you set a race distance, it predicts your finish time.
Race Screen is available for free on Garmin's Connect IQ Store: https://apps.garmin.com/en-US/apps/6a30651b-ca67-41a5-96dc-60634983fc93.
Race Screen has been downloaded over 500,000 times, was one of three finalists for the Best Wearable Workout App in Garmin's inaugural Connect IQ developer awards, and was nicely reviewed by DC Rainmaker here.
Feedback
Race Screen and all its features are absolutely free. Nevertheless, if you find it useful and wish to contribute to its development, there are tip jars at:
Thanks!Leaving a positive review or ratings on Garmin's Connect IQ Store is another way to encourage Race Screen's development. If you have problems, using the Contact developer link on Garmin's Connect IQ Store is preferable to leaving a negative or lukewarm review.
Installation
Race Screen is not an App but a Data Field. It will not appear in the list of apps on the watch. Instead, you need to display it as a field within an activity, like the standard built-in Run activity. Race Screen needs its own screen within the activity.
You first install Race Screen on your watch from Garmin's Connect IQ Store: https://apps.garmin.com/en-US/apps/6a30651b-ca67-41a5-96dc-60634983fc93. You can do this using Garmin's Connect IQ Store phone app on your phone or Garmin Express on your computer. Newer devices also give access to Garmin's Connect IQ Store directly from the device.
Next, in your watch, go to the main Settings menu, Watch Settings, Activities, Run, Run Settings, Data Screens. Configure a data screen with 1 Field as the layout (that is, a single field taking the entire screen), in Data Fields select Connect IQ Fields, and select Race Screen. On recent devices you will be prompted to tailor Race Screen's settings to your needs (see the section Configuration and settings below).
Repeat the previous step for any other Activity in which you wish to use Race Screen. Besides the built-in Run Activity, you can do this for Track Run, Trail Run, Treadmill, or any other running Activity.
The field displays distance based on the unit (km/mile) set for distance in your device's settings and recent and average pace based on the unit set for pace. These units can be different, so that you can match the distance unit to your race's course markers and still keep a different pace unit if you wish.
To adjust race distance using the lap button, you need to enable Round GPS distance on new lap button press in Race Screen's settings explicitly (this used to be the default, but caused confusion to users who where just looking for a data field to display rich information nicely and had not read the instructions). If you have Round GPS distance on new lap button press enabled in Race Screen's settings, you should set Auto-Lap to Off on your watch.
Correction of GPS distance and average pace on a race course
When running a race, the GPS distance measured by your watch almost always differs from the official course distance. Even the most careful runners inevitably weave away from the shortest race line, and there are GPS errors, particularly close to tall buildings and inside tunnels. This can affect your race plans since the average pace displayed by your device may be inaccurate.
Race Screen can help. If you enable Round GPS distance on new lap button press in its settings, then triggering a manual lap on your watch when passing a course marker rounds the distance shown by Race Screen to the nearest kilometre or mile (depending on the distance unit set on your watch). It also adjusts the average pace accordingly. The rounding can be upward or downward.
For example, if Race Screen shows 22.17 km and you trigger a manual lap, it assumes you are passing the 22 km marker and subtracts 0.17 km from the GPS distance. The same behaviour applies to miles instead of kilometres if that is the distance unit set on your watch. The adjustment applied to the distance is also used to recalculate your average pace.
When an adjustment is being applied, grid lines turn red. You do not need to trigger a lap every course marker; any new lap rounds the currently displayed distance again. Triggering a lap twice within 15 seconds removes all adjustments, which is helpful if you press the lap button by mistake.
If you wish to use this feature, you should set Auto-Lap to Off on your watch.
If you wish to use Race Screen only as a way to display information nicely in a single screen, you can switch off the distance/average pace adjustment in the app settings.
Race pacing features
If you set a race distance in the app settings, Race Screen predicts your race finish time. By default, the prediction is based on your current pace. Race Screen sees what race distance remains (subtracting from the target distance the current elapsed distance, adjusted for GPS error). It then adds to the current elapsed time, the time it would take you to finish the race if you keep your current pace. Alternatively, you can specify in the app settings if you prefer the prediction based on your average pace. The calculation is the same but assumes you keep your average pace so far, instead of your current pace, until the end.
You can also set a race target time in the app settings. Then the background changes colour when you are behind the target (when your predicted time is longer than your target time).
Readable and rich display of running-relevant fields
In addition to helping correct GPS errors and pace races, Race Screen displays the most relevant information for running a race or training in a single screen.
The display is specific to each Garmin device, accounting for different screen shapes, resolutions, and fonts. The size and placement of each field are chosen to achieve a good balance between readability and wealth of information. The result is cleaner and richer than configuring a standard built-in multiple-field screen.
Race Screen can simultaneously display:
- Recent pace (this is your current pace averaged over a user-defined interval of 1-60 seconds, with a default value of 10 seconds that can be changed in the app settings).
- Current heart rate (optionally coloured using standard Garmin colours for heart rate zones).
- Current cadence (optionally coloured using standard Garmin colours for cadence zones).
- Current running power (optional, the source can be a Stryd power meter or Garmin's native power estimate, see below for details).
- Elapsed distance (optionally adjusted for GPS errors as explained above).
- Elapsed timer.
- Predicted race finish time (if you specify a race distance different from 0 in the app settings).
- Average pace (optionally adjusted for GPS errors as explained above).
- Weak GPS signal warning.
- Before the activity starts, the time of day.
How these fields are displayed varies depending on whether you are using the race pacing features and on whether you have chosen to display running power.
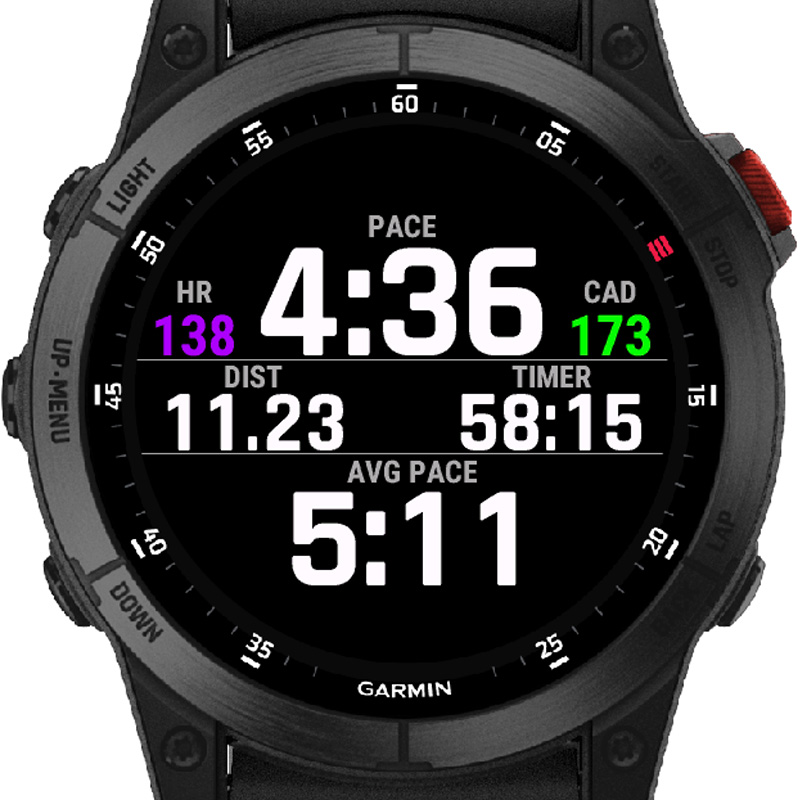
By default (race distance set to 0 and not set to show running power), the Race Screen screen looks as follows:
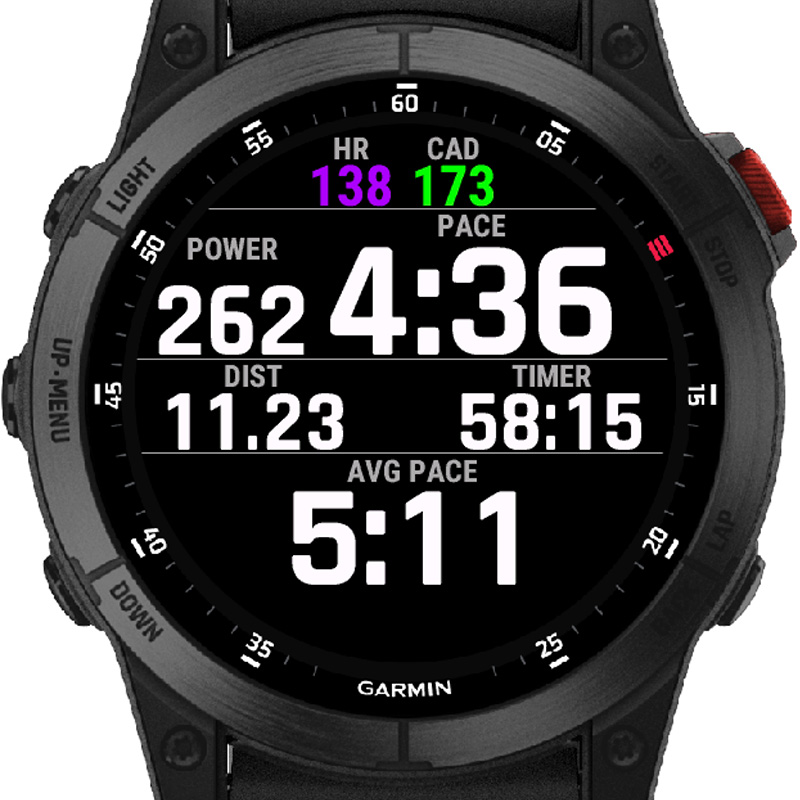
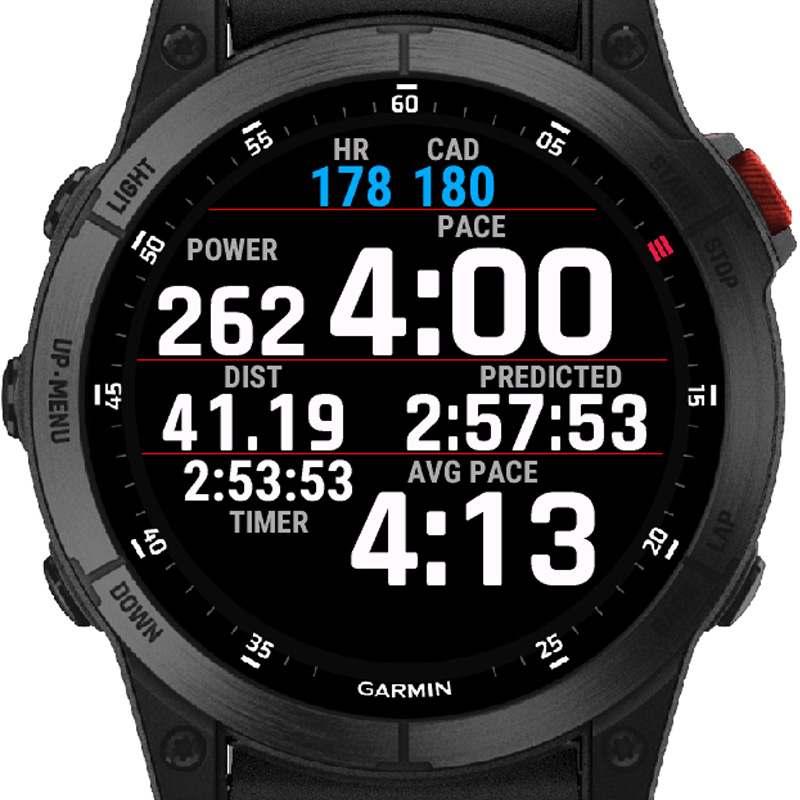
If you tick in Race Screen's settings Display running power, then power is shown to the left of current pace and heart rate and cadence are moved above:
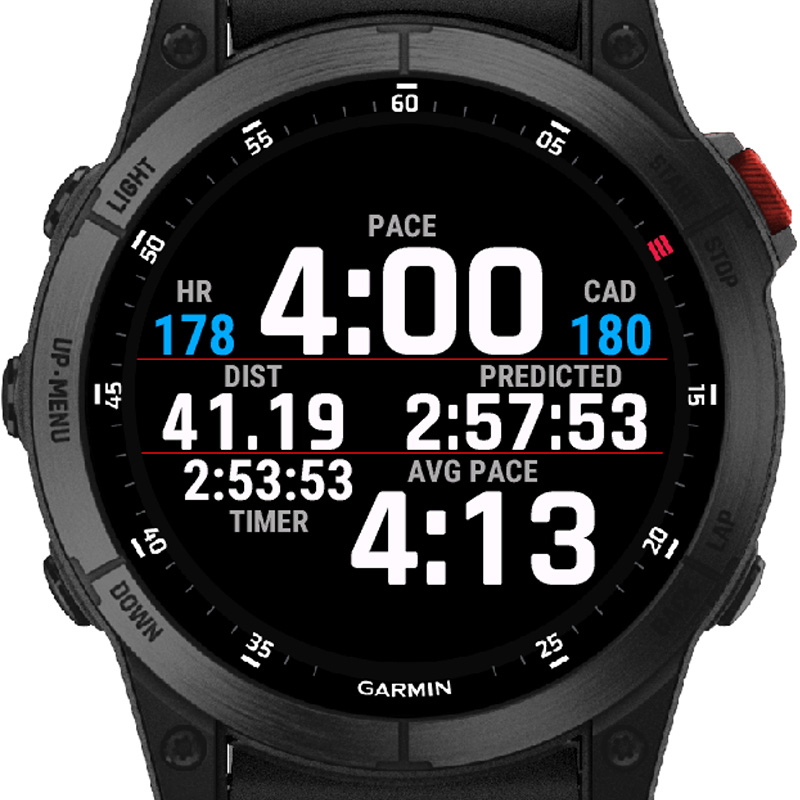
If you specify in Race Screen's settings a race distance different from 0, the predicted race time is shown to the right of the elapsed distance instead of the timer, and the timer is moved to the lower-left corner:
If you choose to display power and specify a race distance, both changes to the default display are combined:
When Race Screen starts, it briefly shows the race distance and target time set in its settings and the lap distance used for rounding when a manual lap is triggered:
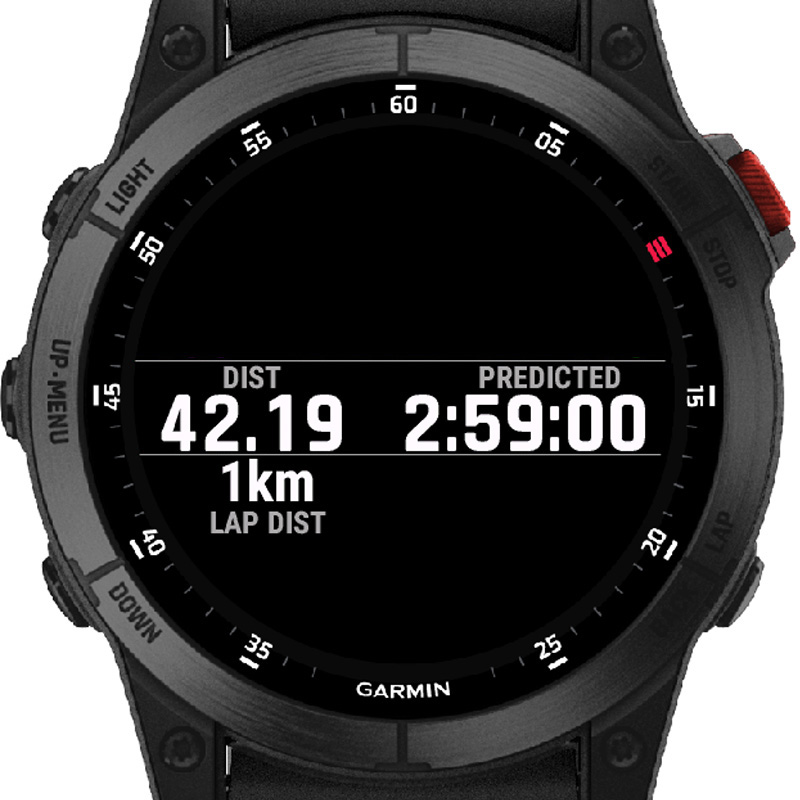
When an adjustment to the distance and average pace is being applied, grid lines turn red. Until a strong GPS signal is acquired, a GPS is shown in red in the lower-left corner. Once a strong GPS signal is available and before the start button is pressed to begin an activity, Race Screen shows the time of the day in the lower-left corner (useful when waiting for a race to start).
Configuration and settings
On recent devices, Race Screen's settings can be adjusted directly on the watch, by far the most convenient option. Regardless of the device, you can also use Garmin's Connect IQ Store phone app on your phone or Garmin Express on your computer.
On your watch, when you first install Race Screen, you will be prompted to adjust its settings, if the watch supports this. To access the settings at a later time, go into one of the Activities where you set up a 1-field screen with Race Screen (like the standard built-in Run Activity), scroll down to Connect IQ Fields, select it, then select Race Screen.
In Garmin's Connect IQ Store phone app on your phone (note this is different from the Garmin phone app), tap on Device, then on My Data Fields, then on Race Screen and Settings.
In Garmin Express, click on your watch, then IQ Apps, select Data Fields from the drop-down menu, and click on the three dots next to Race Screen.
There are 11 configurable settings in Race Screen:
- Seconds used to calculate pace: If you set this to 1, your instant pace is shown in the pace field. If you set it to a number greater than 1, then the pace field corresponds to your recent pace averaged over the number of seconds you specify. The default value is 10, showing your average pace over the most recent 10 seconds. The maximum value is 60.
- Round GPS distance on new lap button press. This can be true (ticked) or false (unticked), depending on whether you wish to round the distance and adjust the average pace when you trigger a manual lap. The default is now false (it used to be true, but this caused confusion to users who where just looking for a data field to display rich information nicely and had not read the instructions). If you tick this option, you should set Auto-Lap to Off on your watch.
- Lap length. The default value is 0, which has a special meaning: Race Screen then expects the distance between race markers to equal the distance unit on your watch (kilometres or miles). Usually, you don't need to change this. For example, if running the New York City Marathon, with course markers every mile, simply set the distance unit on your watch (not Race Screen) to miles. You would leave the Lap length setting in Race Screen with the value 0. Then Race Screen will show the elapsed distance in miles. When you trigger a manual lap, it will interpret this as passing a mile race marker and round your distance to the nearest mile. If running the Valencia Marathon, with course markers every kilometre, set the distance unit on your watch to kilometres. You would still leave the Lap length setting in Race Screen with the value 0. Then Race Screen will show the elapsed distance in kilometres. When you trigger a manual lap, it will interpret this as passing a kilometre race marker and round your distance to the nearest kilometre. If you set the Lap length setting to be a number greater than 0, this is interpreted as a distance in meters. For example, on a 400 metres oval track, you could set this to 400 and trigger a lap when crossing the start line to have the distance adjusted to the nearest multiple of 400 metres. When adjusting the settings on your watch, the only three options for Lap length are 400m, 1km, or 1mi, and if the setting matches the distance unit on your watch, behind the scenes the setting is left at 0.
- Race distance. This is used to get a race finish time prediction. The default value is 0 (will show as -- on the watch), which switches off the race pacing functionality. When adjusting this setting on your watch, you are offered standard race distances of 1km, 1mi, 5km, 10km, 15km, 10mi, 1/2 marathon, and marathon. When adjusting through your phone or computer, you can set this to any distance in meters. For example, if running a 10km race set to 10000, if running a 10 mile race to 16093; if running a half marathon to 21098; if running a full marathon to 42195. Note the use of metres is only for the purpose of adjusting the setting through your phone or computer, Race Screen will still display the distance in your device's unit, kilometres or miles.
- Race target time. If you set this to your race target race time, the background will switch colour (to white when your defaul is black or to black when your default is white) when you are behind the target (when your predicted time is longer than your target time). Note you can get a predicted race time even if you leave this setting at 0 (shown as -- on your watch), the target time only affects the background colour change. When adjusting settings on the watch, you can set this conveniently in hours, minutes, and seconds. When adjusting settings through your phone or computer, you need to input a time expressed in seconds. For instance, 2:59:59 is 10799 seconds (2x3600 + 59x60 + 59)
- Base race time prediction on average pace: This can be true (ticked) or false (unticked), depending on whether Race Screen should predict your race finish time assuming you maintain your average pace until the end (option ticked) or asssuming you maintain your current pace until the end. The default is unticked (assume you keep your current pace until the end). The race finish time prediction requires that Race Screen knows your race distance, specified in the Race distance setting.
- Display HR and cadence in color: This can be true (ticked) or false (unticked), depending on whether you wish to display heart rate and cadence in colour or not. The default is true. For heart rate, Garmin typically assigns a neutral tone to zone 1 or lower, blue to zone 2, green to zone 3, orange to zone 4, and red to zone 5 or higher. Race Screen uses the same colours, but also distinguishes zone 1 (purple) from below zone 1 (neutral tone). For cadence, Garmin assigns purple to >183spm, blue to 174-183spm, green to 164-173spm, orange to 153-163spm, and red to <153spm (see https://support.garmin.com/en-US/?faq=LZjk6J8lVU5hYG9AuYpzJ7).
- Set black as default background: This can be true (ticked) to use black as the default background colour or false (unticked) to use white as the default background colour. The default is ticked (black background). As explained above, if you set a target race time, the background will switch colour (to white when your defaul is black or to black when your default is white) when you are behind the target.
- Display running power: This can be true (ticked) or false (unticked) and controls whether to display running power. See the next section, Running power, for details. The default is unticked (no running power).
- Stryd ANT ID: If you have a Stryd pod, in addition to ticking Display running power, you specify here its ANT ID. See the next section, Stryd running power, for details.
Running power
If you have a Stryd pod (see https://www.stryd.com/),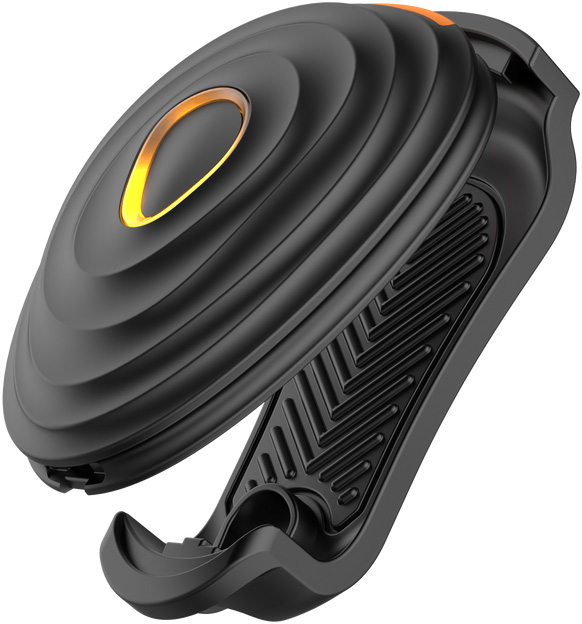 Race Screen can display running power. It retrieves current running power by establishing a direct connection to your Stryd pod using an ANT generic channel. If you don't have a Stryd pod, Race Screen can alternatively display Garmin's native running power estimate.
Setting up Stryd running power
Other running power sources
If you don't have a Stryd pod, Race Screen can display Garmin's wrist-based running power estimate. To enable this, you need to tick Display running power in Race Screen's settings but leave the Stryd ANT ID setting of Race Screen's settings at the default value of 0. If the Stryd ANT ID setting has a value different from 0 but Race Screen cannot connect to your Stryd pod, it will also display Garmin's wrist-based running power estimate instead. For clarity, the label of the power field on Race Screen's display will then show G POWER (for Garmin power) instead of just POWER.
Important warnings
The distance displayed by this data field may differ from the built-in distance field. This is by design, to help the user correct the difference between the GPS-measured distance and the official course distance when running a race by triggering a manual lap when passing an official course marker. If you wish to use this field only as a way to display information nicely in a single screen, you can switch off the distance/average pace adjustment and set the race distance and target time to 0 in the app settings.
The GPS correction applied by Race Screen only affects the distance and average pace displayed by Race Screen itself during your activity. This GPS correction does not apply to the activity uploaded to Garmin Connect, which will still reflect the GPS track captured by your watch. If you set up another screen on your watch to display distance of average pace, the GPS correction will not apply to that screen either, only to Race Screen.
This data field is distributed in the hope that it will be useful, but without any warranty. As a precaution, configure additional screens on your device to display information relevant for your race, and try Race Screen while training before using it during a race.
Changelog
- v1.8.0: User interface for on-device settings change, ability to display Garmin power when Stryd pod not available, Round GPS distance on new lap button press off by default for new installs
- v1.7.12: Support for Approach S50, S70 (42mm, 47mm), Venu X1, fēnix 8 Pro (47mm, 51 mm, MicroLED)
- v1.7.11: Support for Forerunner 570 (42mm, 47mm), 970
- v1.7.10: Support for Vivoactive 6
- v1.7.9: Support for Enduro 3, fēnix 8 (43mm, 47mm, 51 mm), fēnix 8 Solar (47mm, 51mm), fēnix E
- v1.7.8: Support for Forerunner 165, 165 Music, Descent Mk3i (43mm, 51mm)
- v1.7.7: Support for Venu 3, 3s, Vivoactive 5
- v1.7.6: Improve display on Forerunner 965
- v1.7.5: Support for epix Pro Gen 2 (42mm, 47mm, 51mm), fēnix 7S, 7, 7X Pro
- v1.7.4: Support for Forerunner 265, 265s, 965
- v1.7.3: Fix Vivoactive HR display
- v1.7.2: Fix pace rounding
- v1.7.1: Support for Descent Mk2S, Venu 2S
- v1.7.0: Ability to connnect to Stryd pod directly using generic ANT channel
- v1.6.13: Support for D2 Air X10, D2 Mach 1
- v1.6.12: Use Garmin colours for cadence and HR zones, support for MARQ2
- v1.6.11: Support for Forerunner 955, 255, 255 Music, 255s, 255s Music
- v1.6.10: Improve display on epix (Gen 2)
- v1.6.9: Add Display cadence x 2 option as fix for Garmin cadence bug
- v1.6.8: Support for Venu 2, 2 Plus
- v1.6.7: Temporary fix for Garmin cadence bug
- v1.6.6: Support for epix (Gen 2), fēnix 7S, 7, 7X
- v1.6.5: Support for Forerunner 55 and 945 LTE
- v1.6.4: Support for Descent MK2, Enduro, MARQ Golfer
- v1.6.3: Support for Approach S62, D2 Air, Forerunner 745
- v1.6.2: Support for Legacy Saga devices, fix timer font size, memory savings
- v1.6.1: Support for MARQ Adventurer, Commander, layout tweaks
- v1.6.0: Add option to display Stryd running power on multisport devices with Stryd paired as power meter
- v1.5.1: Support for Venu
- v1.5.0: Support for fēnix 6S, 6S Pro/Saphire, 6, 6 Pro/Saphire, 6X Pro/Saphire/Solar, Vivoactive 4, 4S
- v1.4.7: Support for Forerunner 245, 245 Music, 945
- v1.4.6: Support for MARQ Aviator, Captain, Driver, Expedition, Vivoactive 3 Music LTE
- v1.4.5: Support for D2 Delta, D2 Delta S, D2 Delta PX
- v1.4.4: Support for fēnix 5S Plus, 5 Plus, 5X Plus, Vivoactive 3 Music
- v1.4.3: Support for Forerunner 645 APAC
- v1.4.2: Support for Forerunner 645
- v1.4.1: Add Italian
- v1.4.0: Add option to set lap length different from 1km or 1 mile, Support for Vivoactive 3 (double-tap to trigger a manual lap), Descent MK1, add German
- v1.3.3: Add option to predict race finish time assuming the average pace so far is kept until the end, Support for Approach S60
- v1.3.2: Support for Forerunner 935, update fēnix Chronos, improve readability on fēnix 5S
- v1.3.1: Support for fēnix 5S, 5, 5X, Vivoactive HR, improve readability on semiround and rectangle devices
- v1.3.0: Support for Forerunner 920XT, Vivoactive, D2 Bravo
- v1.2.0: Add predicted race time and pacer functionality
- v1.1.4: Add option in settings to set black as the default background
- v1.1.3: Add option in settings to display heart rate and cadence in color or not
- v1.1.2: Support for fēnix Chronos
- v1.1.1: Fix handling of settings changed from Garmin Connect Mobile
- v1.1.0: Support for Forerunner 230, 235, 630, 735XT
- v1.0.1: Improve handling of user settings
- v1.0.0: First public release, compatible with fēnix 3, 3 HR
